Hello Fellow Clashers! I’m KairosTime and today I’m bringing you a Strategy Guide on How to Manage Elixir so you can improve your gameplay! This is a guide for new players and experienced alike!
This written guide comes with a video guide that includes specific examples that I would recommend watching!
How to Manage Elixir in Clash Royale
Table of Contents
What is an Elixir Advantage?
An Elixir Advantage is when your total Elixir is greater than your opponent’s.
This includes the Elixir in your Elixir Bar, as well as the cost of the troops that you have on the field.
It has been said that even a 5 Elixir advantage total can win you the entire match. This means that it is essential to try and manage your elixir so that you can overwhelm your opponent.
Note: While an Elixir Advantage is extremely important, there are other important aspects in the game that can win or lose you a match despite Elixir Advantages. I will cover these in future videos and guides.
All the ways to gain an Elixir Advantage!
There are lots of ways to get an Elixir Advantage, and some are more complex than others. We’ll cover them in order of how easy it is to understand the advantage you’ll get.
Spells
This is the easiest to calculate. You can get an advantage by spending less to clear a troop with a spell than your opponent spent to put that troop down.
All this requires is simple math.
Examples:
- Spend 2 Elixir to Log 3 Elixir Goblin Barrels for a +1 Elixir Trade
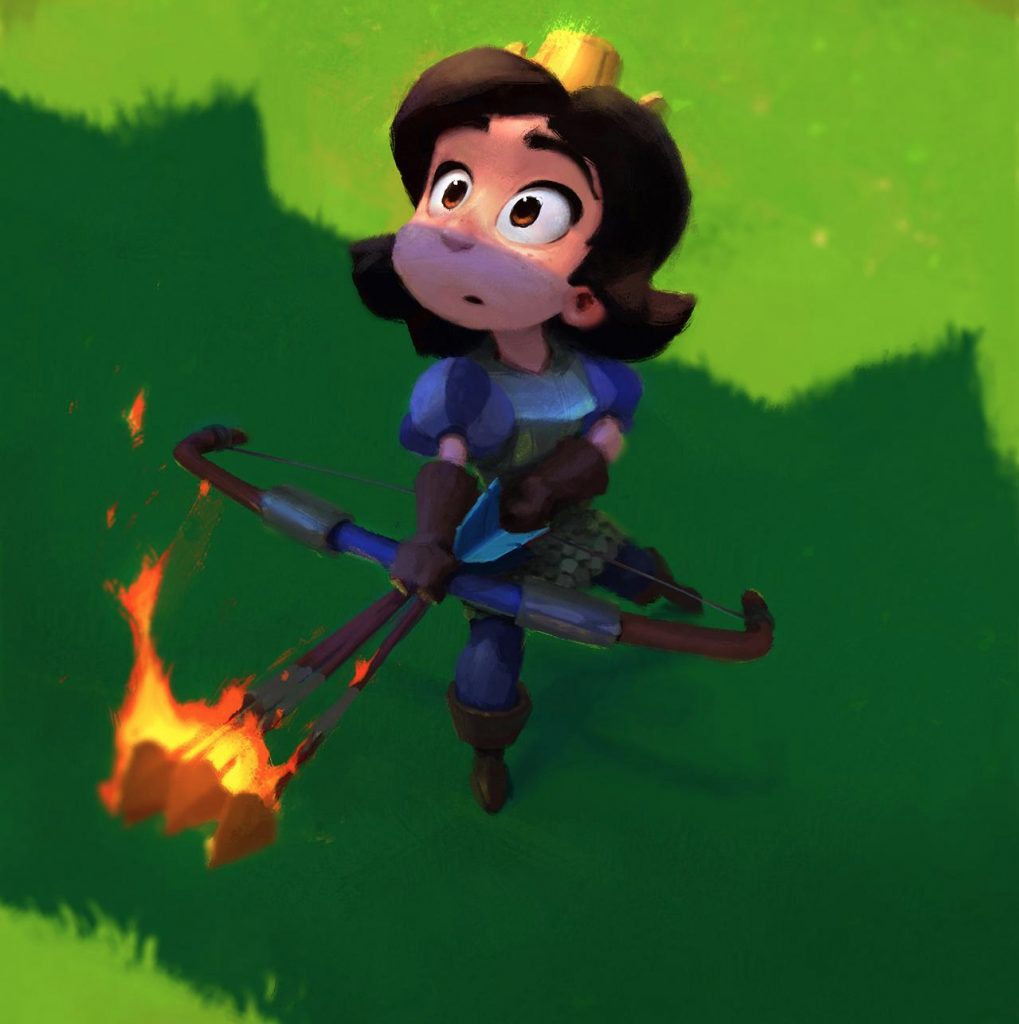
- Spend 3 Elixir to Arrow 5 Elixir Minion Hordes for a +2 Elixir Trade
- Spend 4 Elixir to Fireball 5 Elixir Barbarians for a +1 Elixir Trade
Positive Elixir Trade? Fanart by captainsunshines
Troop Interactions
The way that troops interact with each other will also help you gain an elixir advantage if you play the right troops in the right places.
There are 3 ways that troops will interact in order to help you gain an advantage:
- Death for Death
- Death for Counterpush
- Death for Answer
Death for Death
A Death for Death interaction is where the troop that you place will clear the enemy troop, but will die in the process. To get an advantage, you need to spend less elixir defending than the cost of the enemy troop
Examples:
- Spend 3 Elixir for a Mega Minion to clear a 4 Elixir Baby Dragon for a +1 Elixir Trade
- Spend 2 Elixir for Fire Spirits to clear 3 Elixir Minions for a +1 Elixir Trade
- Spend 2 Elixir for an Ice Golem to clear a 3 Elixir Skeleton Army for a +1 Elixir Trade
Death for Counterpush
A Death for Counterpush interaction is where you place a troop that will defend the enemy push so that your troop will have full, or near-full health. This allows you support that troop, or use that troop as support for another card for a strong counterpush.
Because your opponent spent Elixir with their push, but your troop has full health, they will have to spend more Elixir to clear that troop which gives you an advantage.
Examples:
- 3 Elixir Skeleton Army to defend a 3 Elixir Miner
- With the majority of the Skeleton Army still alive, your opponent will have to spend more elixir to get rid of it
- 7 Elixir PEKKA to defend a 4 Elixir Hog Rider
- With a full-health PEKKA and your opponent being down 4 Elixir for the Hog Rider, you’ll be able to support the PEKKA with an Elixir Lead
- 4 Elixir Valkyrie to defend a Goblin Gang
- Use the Valk to support your win condition to make for a difficult push to stop.
Death of Answer
This is very similar to Death for Counterpush, except that you don’t support your defending troop but your opponent still has to spend Elixir to counter your defender.
Getting an Elixir advantage this way depends on your opponent making poor card choices to get an advantage. This makes this a non-reliable way to get an advantage, but it’s important to note.
This can be a smart move if you want your opponent to go on the offense when you’re ready for them.
Examples:
- Spend 3 Elixir for a Mega Minion to clear a Princess at the bridge.
- If your opponent defends with an Ice Spirit this would be an +1 Elixir Advantage.
- If they defended with a Musketeer, this wouldn’t be an advantage
- Spend 4 Elixir for a Furnace to clear 3 Elixir Minions that would then require a response
- If they defend with a Poison only or Fireball only, this would be a +3 Elixir Advantage (-1 for Minions, and +4 for the spell)
- Spend 3 Elixir for Minions to clear a lone Knight
- If your opponent defends with Zap, this would be a +2 Elixir Advantage
- If your opponent didn’t defend with anything, this would be a neutral trade
Elixir Collector
The Elixir collector is really simple, but it also has 1 aspect to it that a lot of people don’t think about, and that can cost them the game.
The simple part with the Elixir Collector is that you invest 6 Elixir for the Elixir Collector to give you a total of 8 Elixir over a period of time. This is a 2 Elixir Advantage (That’s simple). That’s not the only aspect to how the Elixir Collector gives you an advantage.
Elixir Collector and Elixir Rate
The biggest advantage of the Elixir Collector in my opinion, isn’t the 2+ Elixir Advantage, but the fact that it gives you a faster Elixir Rate during the duration of the Elixir Collector.
Normally, you gain 1 Elixir every 2.8 seconds (1.4s in 2x Elixir). When you have an Elixir Collector down, this increases your Elixir rate to 1 Elixir every 2.1 seconds (1.1 in 2x Elixir). This means that if you can put down an Elixir collector and keep it safe, you will have a faster Elixir Rate than your opponent, which means you can put troops down faster. If you use this advantage right, you can use this to overwhelm your opponent.
If my opponent has the Fireball or Poison, I will still use the Elixir Collector as long as I can spare some health on the tower closest to it because I will still have a faster Elixir rate than my opponent. Also, playing the Elixir Collector brings the advantage of forcing your opponent to go on the offense when you want them to. This gives you control in the match in addition to getting an Elixir Advantage.
Spawners
When it comes to spawners, the math starts to get more complicated. Ultimately, you need to know that if a Spawner isn’t dealt with, it can produce massive value if it isn’t dealt with properly. They allow you to defend while putting pressure on your opponent.
To best explain how Huts give value, here is a chart that I will explain:
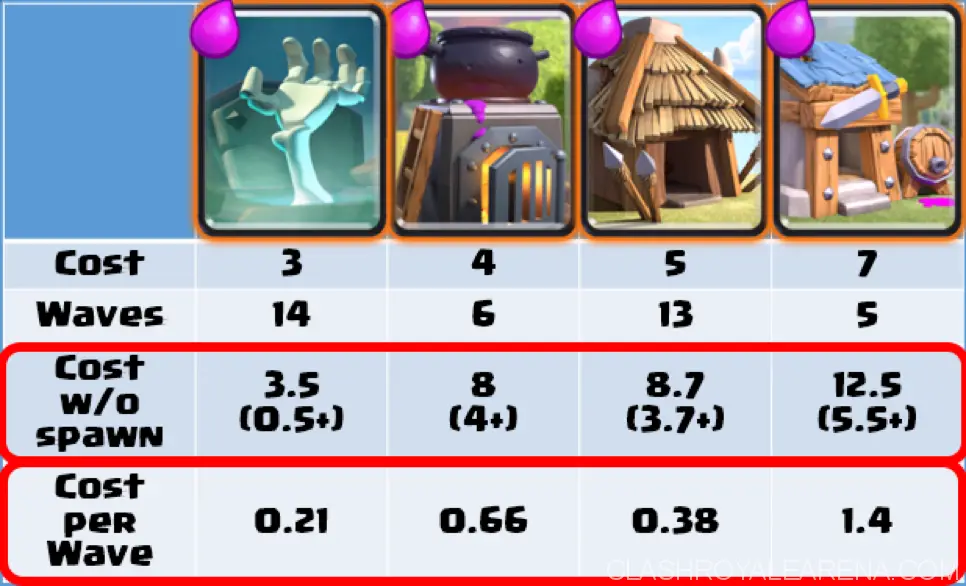
- Cost: This is the Elixir cost to place the hut down (Simple, right?)
- Waves: This is the number of waves that are produced during the lifetime of the spawner (Still with me?)
- Cost w/o spawn: This is how much it would cost to deploy the same number of troops if you didn’t have the spawner. The number in parenthesis tells you how much you save in Elixir if the Spawner isn’t damaged in battle
- Cost per wave: This is how much elixir it costs for each individual wave of troops coming out of the Hut. If you want to get an Elixir Advantage against a spawner, you will need to spend a small amount of elixir to get rid of as many waves as possible
Example:
- The Barbarian Hut costs 7 Elixir and produces 5 waves of 2 Barbarians which is a total of 10 Barbarians.
- In order to normally produce 10 Barbarians, you’d need 2.5 sets of the regular 4 Barbs. This would theoretically cost you 12.5 Elixir but because you only spent 7 Elixir to put the Hut down, this theoretically gives you a 5.5 Elixir advantage
- In order to get an Elixir advantage when facing a Barbarian Hut, you would need to spend less than 1.4 Elixir per wave, or put down a troop that would take care of multiple waves (like a Bowler)
Because of the mechanics of Spawners, they can be used to get an Elixir Advantage if your opponent doesn’t have a good way to clear them, or doesn’t know when to absorb damage, and when to defend.
Shout out to FIGGY0023 (FIG Kid Clashet) and his stunning contents.
3 Resources to Managing Elixir
Aside from gaining Elixir Advantages through the means previously mentioned, there are other resources that you can use and master in order to manage your Elixir to ensure you have the advantage.
These additional resources are:
- The Elixir Bar (Leaking)
- Tower Health
- Time
The Elixir Bar & Leaking
When you are at 10 Elixir, you stop generating Elixir and won’t continue generating Elixir until 1 second after you place your next card (more on that 1 second later).
This is called Leaking or Bleeding Elixir.
If you leak too much, and your opponent doesn’t leak any Elixir, you can get a disadvantage simply because you took too long to play your card.
By making sure you never, or rarely leak elixir, you can give yourself the advantage.
1 Second Server Delay: Clash Royale said in a comment on Reddit, “There is an intentional 1 second delay built into card deployment for all players, which helps to smooth out different degrees of latency across the globe.
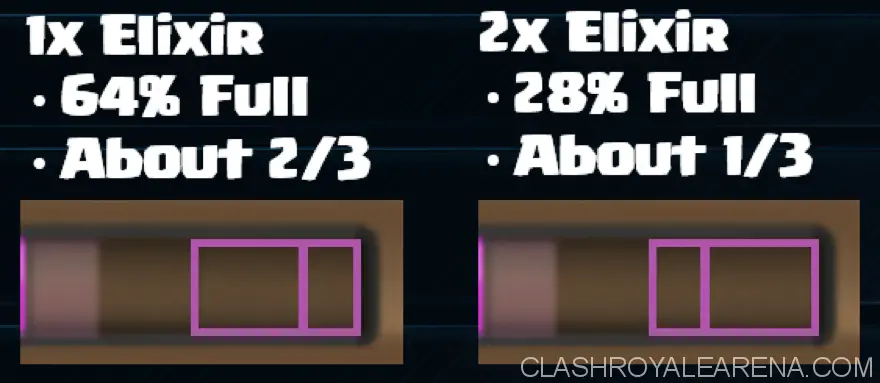
Important: Because of this 1 second Server Delay, if you do not want to leak elixir, you have to play your cards at least 1 second before you are at 10 elixir.
The diagram below shows when you should place your cards so you don’t leak any Elixir:
Note: If you are using the Elixir Collector, the bar should be 1 Elixir before so that you don’t lose the Elixir that your pump generated.
Tower Health
The 2nd resource that you can use in order to manage your elixir is your tower’s health.
Important: The only HP that counts is the last HP on all of your towers! Every other HP is just a means to get to that last HP, but only that last HP will get you a crown.
One of the differences between a good player, and a great player is how well they use their tower’s health as a resource by allowing an enemy troop to damage a tower rather than defending so they can save up Elixir.
Examples:
- Use a 3 Elixir Mega Minion to defend a Hog Rider rather than a 3 Elixir Cannon. The Hog Rider will do damage to the tower, but you can then support that Mega Minion for a counter push that will be difficult to stop since the opponent spent 4 Elixir on a now-dead Hog Rider
- Rather than defend against a Miner who is on a tower with a decent amount of HP, rush the other lane, or drop a big tank (PEKKA or Golem) and build up a push. By doing this instead of defending the Miner, you have more Elixir on the field and that can make it difficult for an opponent to stop you.
- Defend an Electro Wizard with Skeletons and let him hit your tower once. By allowing him to hit your tower, you’ve gained a 3+ Elixir advantage that you can use to punish your opponent later.
Important: It takes a lot of practice to know when you can afford to take some damage on your tower, and when you should focus on defending. By mastering this one principle, you will truly become a master in The Arena!
Time
The last topic we’ll touch on when it comes to managing your Elixir is the resource of Time. When it comes to time, troop placement and troop speed play a big role in how you can use time as a resource to gain Elixir.
Troop Positioning: By placing your troops in different locations, you can gain more elixir than your opponent in the sense of having more troops on the field by the time they reach the bridge. By placing a slow troop at the bridge, you essentially have 0 seconds to gain more elixir in order to support your troop, but if you put it behind the King’s tower, you have 16.8 seconds to build up Elixir, which allows you to make an even stronger push with the additional 6 Elixir you’ve generated in the time it takes for that slow troop to reach the tower.
Troop Speeds: Slower troops give you more time to build up Elixir before they reach the bridge, while faster troops give you some time, but maybe not enough to actually make this advantageous. Below is a charge explaining how much Elixir you can gain depending on the troop speeds by placing them behind your King’s Tower in both 1x and 2x Elixir.

Example: By placing a Giant at the bridge, you have 0 seconds to gain elixir before your main push has begun. By placing a Giant behind the King’s Tower, you have 16.8 seconds to gain elixir before your push has begun. By the time your Giant makes it to the bridge, you will have built up an additional 6 to 12 Elixir (1x and 2x Elixir) that you can use to Defend the other lane, or to support your main push.
Thanks so much for reading this guide! If you made it this far, you should now have the tools necessary to Manage your Elixir.
This is Part 1 of a series I am coming out with that I call, “The Strategy Guide to Clash Royale”.
If you’re interested in learning more, make sure you subscribe on my YouTube Channel so you can be the first to see my guides.
If you have any questions, feel free to leave them as comments on my video and I’ll get back to you as soon as I can!
Ticking By,
KairosTime

