Home Blog Page 54

Beating the Prince Joust Challenge

0


Hello Royale Clashers! As we moved into a new month, we have a new season. And every season brings with it a lot of exciting things in Clash Royale—emotes, new challenges, metas, balance changes and so on. In the new season called Prince’s Dream, we have the Prince Joust Challenge. 


Prince Joust challenge was unveiled on the first day of season 12. After completing the challenge, players got a legendary chest as a reward. Sadly, no emotes in this challenge. The challenge is now completed and appears on the card collection day in clan wars and friendly battles. So there is still a month (maybe more), and you will want to excel at it to get some good wins.


What is Prince Joust?


Like every other challenge in which troops spawn at regular intervals from behind the towers, in this royal prince with armor and lance spawns.

The first prince starts from your tower and your opponent’s ten seconds into the game. 

Again after 25 seconds, a set of the princes start jousting towards their opponent’s towers.

The elixir ramps up after you are one minute into the game. 

After half the time, that is when one minute and a half is left, two princes from each side of the arena start spawning. 

When a new challenge comes up in the game, you should ask the first question—does this need a deck of its own? This is the foremost thing that you should think, and if you don’t do it right now, you will face difficulties as most of the time the answer is YES!

So the first tip is to build a deck style=”font-weight: 400″> for the challenge. You have to play it for more than a month, and you are relying on a meta?! Jumping into the Joust with your hog rider cycle will leave you frustrated after a few matches. 

Decks for Prince Joust

Swarm attack

Swarm Attack Deck

This deck has an average elixir cost of 3.5 which means that it is a fast deck and you should be moving your fingers as the game progresses. The strategy of using this deck is defense. You don’t have to think hard about pushing the lanes and conquering the towers. Most of the cards on this deck are tiny killers and they won’t bring the bricks down for you if you let them run over the bridge. So what will they do? Let’s find out.

One thing you must know is how to deploy the cards in a way that counters your opponent’s charging princes and at the same time give you a chance to counter-push. 

You will start off with a prince spawning on your left tower. You will start off with the witch or the firecracker on the right to counter your opponent’s jousting prince. Place the skeletons in the middle of the arena when their prince gets to your side. 

  • Skeletons will be used as bait and to stop the prince’s joust in this game every time. 
  • Your firecracker or witch easily takes out the prince with the help of the three skeletons. Use the arrows or poison when they put a swarm troop to stop your prince. 
  • The win condition is to defend nicely and make your prince reach their tower. The guards easily take out a prince, so putting it again in the middle is a defense for you while you use your elixir on poison to clear your prince’s way.
  • Put bats in combination with firecracker and guards to defend when you see that two red horsemen have begun charging from the enemy’s towers. 
  • You will be needing to place the royal recruits after successfully defending your towers and collecting elixir. Put them at the bridge if your princes are charging and they build a kind of pressure that your opponent won’t be able to take! They will be draining elixir. Royal recruits are the real counter-push here and let them out in the arena at the right time.

Prince-o-Barrel

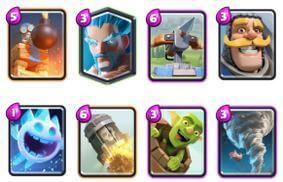
Prince o Barrel

By the look of this deck, you can tell that this is going to blazing fast. The average elixir cost is 2.8! There are no offensive troops on this deck. You must have gotten the point of this challenge now. You somehow make your princes joust to your opponent’s towers and nudge them with the lance while protecting yours. Let’s get into this.


  • Electro Dragon is a good card here to break the charge of the enemy princes. It is the only purpose of the blue beast. 
  • Pair your electro dragon with bats to defend whenever the pair is available. I suggest starting off the game with your electro dragon hovering over your tower and bats biting the red prince.
  • Keep the zap and log handy at the same time for clearing your prince’s way. Most of the decks will have the skeleton army or some other swarm so use your zap or log on those. 
  • The next step is to the tombstone in the middle of your side of the arena. This is a building which should be in its place most of the time. Comes handy if your opponent releases a hog or ram rider to surprise you. 
  • Tip: Do not let the hog or prince reach the tombstone. Tombstone has no hitpoints and use it as just a bait. Drop your guards to kill the prince while tombstone remains intact. 


Pushing:

  • When your Electro Dragon flies over the bridge after taking out the enemy prince, give it company by the skelly barrel. 
  • Skelly barrel is paired with the dragon or the charging prince. Never alone!


Tips for Prince Joust

I have explained to you two decks above, and by any means, these are not the only ones. You can build your own and can destroy your enemies. The overall strategy will remain the same, though. Here are some general tips to remember while playing it.

  • Low hitpoint cards are not a good defense. Examples are electro wizard, hunter etc. They will be out in one hit by the angry jousting prince. 
  • Do not try to push using a tank as a typical game. You will waste your elixir and would be forced to watch their prince slamming into your tower. 
  • For the same reason stated above, do not have more than one significant-sized troop on your deck. 
  • Do not put all your swarms at the same time. Mark this. You will invite arrows or fireball this way.

I hope that you liked the article and are excited to practice these decks in the game. Learn the decks with a friendly mode and then head to battle. If you have any other ideas or tips of your own, comment them below. 


We will be coming with new guides to help you. So make sure you follow Clash World to not miss any update. Till then, stay safe and keep clashing!

Balloon Festival Guide

0

Hey, Clash Royale players from around the world! It’s The JK Landa back at another guide for the new Balloon Festival, tips for beating the challenge, and good decks for it.

Clash Royale Balloon Festival Guide

But, first, let’s start off with the basics and some general knowledge about the Balloon Festival challenge.

As you all may know that late in season 8, Clash Royale released a new challenge called the Balloon Festival.

  • First, with a 2vs2, then, a 1vs1 challenge.
  • At the end of the 1vs1 challenge, players earned a limited and exclusive first balloon emote, which sadly can’t be earned anymore :(. If you got it and have it, be sure to tell me in the comments section down below!
  • There is no more of a “Balloon Festival Challenge”; however, there is the balloon festival mode, which is only 1 vs 1, not 2 vs 2; this mode still appears in the party mode and during collection day for clan wars, as of now.

About the Balloon Festival Challenge

Now, let’s talk a little about the challenge itself. The challenge is pretty self – explanatory from its name, but let me just give a quick overview to you in case you don’t know.

  • After 10 seconds of the game starting (at the point where 170 seconds are left), one balloon will spawn from your side and your opponent’s side.
    • It will be 2 Balloons on your side and your opponent’s side if you are playing the 2vs2 mode.
  • After the 2 minute mark, the game will turn into double elixir, and also a new set(s) of balloons spawn every 20 seconds.
  • After the 90 second mark, two balloons start spawning on your side and your opponent’s side if you are playing the 1 vs 1 mode, and 4 balloons on each respective side if you are playing the 2 vs 2 mode.

As of today, you guys might not care about the 2 vs 2 mode since it is less likely that Supercell will bring the 2vs  mode for the balloon festival.

Also, if you somehow manage to get into the last minute of overtime, 4 balloons will spawn on each respective side for 1 vs 1 and 8 for 2 vs 2. Woah! Can you imagine how many balloons that must be?!?

Clash Royale Balloon Festival Guide 2

Good Decks for Balloon Festival

Now, this section is what all of you have been waiting for, good decks for beating this challenge, which isn’t really that difficult!

Dark Prince Rocket Deck

Clash Royale WizardClash Royale Mini P.E.K.K.AClash Royale Rocketfirecracker
Clash Royale BatsClash Royale TeslaClash Royale HunterClash Royale Dark Prince

A 4.0 elixir deck, which doesn’t make it too expensive considering the fact that the game is double elixir for the majority of the time.

Now, the very first thing that you want is to make sure that your cards are all leveled up, this is a MUST!

The only way to beat those devastating balloons is to make sure your air troop cards can deal massive damage to those nasty balloons. Now, yes, you must be thinking, isn’t the balloon festival capped at level 9. Now, this is true for the mode during collection day in clan wars and the actual challenge; however, in the “party” mode, your king level is used hence it is strongly required that you max out those specific cards.

The overall game strategy for this deck is to deploy the air troops as fast as possible to destroy the opponent’s balloons and also at the same time push opposite lanes with the Dark Prince and the Mini Pekka. This will force your opponent to leak a lot of elixir which is very good for you! Next, make sure to always save your rocket just in case your air troops are knocked out ( I will explain how this is possible).

The rocket can easily kill the balloons, it is preferred when you rocket to rocket the balloons when they are crossing the opponent’s princess tower because you can get chip value.

The tesla is a very important card in this deck because it can easily stop counter lane pushes since it will draw the troops from both lanes into the center while your air troops can easily destroy them with splash damage or  maybe you can rocket there if you want to.

The bats will primarily be used to only kill the balloons since you want to bait your opponent into either using their zap or arrows because then you will have the firecracker ready.

The firecracker and the hunter will act as very versatile cards in this deck since they can play both offensive and defensive positions but mainly defensive positions to kill the balloon.

Now, I will explain to you how your troops which attack the air can be taken out, which are your firecracker, hunter, bats, and wizard. Since these troops are not that high HP cards, they can be easily taken out by the lighting spell or they might also play the mini pekka / prince/ dark prince in front of their balloon hence which will take out your troops which kill air hence it is needed to have a rocket in this deck!

Splash Hoard

Clash Royale MusketeerClash Royale WizardClash Royale Baby DragonClash Royale Executioner
Clash Royale Skeleton ArmyClash Royale BatsClash Royale Minion HordeClash Royale Night Witch

This is another 4.0 elixir deck but a major difference in this deck and the previous deck is that deck weighs a lot on defense and has barely any offensive potential.

The trick to winning with this deck is to defend really well and use these troops and your balloons to turn it into a counter push.

The overall game strategy for this deck is to take down your opponent’s balloons and turn any remaining or alive troops into a counterpush.

The bats and minion horde will primarily be used to take down your opponent’s balloon.

The wizard, baby dragon, and executioner can be used to get good splash damage. You can also use these troops to turn into a counterpush by supporting your balloons!

https://www.youtube.com/watch?v=BDb-RybqbY

Now, you have read about some good decks for this challenge, I will now talk about some very good tips that are very handy for this deck and challenge or mode, whatever you want to call it.

I just like to call it a challenge since it was originally released as a challenge and that’s what I have been calling it ever since. 🙂

Best Tips for Balloon Festival

The first tip for this challenge in general (stated earlier) is to make sure all your cards are leveled up if you are playing it in “Party” mode (all cards are capped at level 9 for collection day battles). This is a must since this means slightly more health and damage for your troops.

Another tip is to make sure to Rocket the Balloons if you are planning on doing this is when the balloon is crossing the opponent’s princess tower so you can get value and chip damage.

This tip pertains to the second deck which I talked about earlier. The reason why this deck mainly only has troops that are used for defense is that these will just make your defense unbeatable and you can use them later as counterpush! Also, make sure to deploy these defense troops one at a time ( trust me, one troop can take down swarms of balloons since they do splash damage) since if your opponent decides to lightning/ fireball/ arrows, you always have something else ready. If you place everything down at once, your opponent can take it all down in one spell and get a good elixir trade from you!

Let the balloons do the offensive damage, you just do your part by playing stellar defense and you will win the game. I can say this from first – hand experience.

If you are losing many straight games, consider taking a break and you will automatically start winning. Check out my earlier article for that, which is about tilting. Will, can you link the article by and embed the link. Thanks!


I hope you enjoyed today’s article very much and I hope you found it helpful in your balloon mode/ challenge adventure. If you disagree with anything, be sure to let me know in the comments section and I will sure try my best to edit it.

For now, enjoy, stay safe, and stay tuned for the next articles and be sure to check out the articles from other great authors on this site if you haven’t already!

Avoiding Tilt in Clash Royale

0
meta decks

Hey, Clash Royale players from around the globe! I am JK Landa, and this is a follow-up guide from the previous guide published by Rohan Reigns. That guide explained and talked about losing streaks and tilts. This guide will specifically focus on tilts, signs that you are tilting and all the possible causes of them and how they can be avoided in total. 


As we all know, mostly from first-hand experience, we all have times when we lose massive amounts of games, which can possibly lead us to go down the trophy road and into a lower arena or league. The more this happens, the more we get frustrated and we want to play to get a single win. However, this will never happen because of our brain and how we are thinking. Our brain is only thinking about getting the next win and we slowly start to lose focus in the game itself and we make bad moves and then we lose massive amounts of trophies, which isn’t good! 


Tilts are especially common when you have a major losing streak and you just want to get one win. During this process, you and your brain are just thinking about getting that one win, but you aren’t really concentrating on the gameplay itself hence you will be most likely to commit many silly mistakes.


Times when Tilting can Occur

You can tilt when you are playing in a grand challenge or a special challenge and you lose that match and you are now out of the challenge. This will send hormones to your brain causing an immense amount of anxiety, causing you to go crazy. 


Another way you can tilt is if you call it a “fat-finger” or a “ bad play” on accident, for example putting the Sparky in the wrong lane; because this means you have lost the game since it is extremely hard to come back if you do a misplay during the final minutes of the game. You will know the first thing which I talked about, your brain just losing it. 


The next major way in which you could tilt is through having a poor connection, because this how Clash Royale and a lot of the Supercell games work.


Signs that indicate that you are Tilting

There are a couple of distinct signs which point out if a player is tilting. The first one is obviously that the person will start to rage and become extremely frustrated at the game and at times even start swearing at the game and blaming Supercell and the creators of it for making such a “terrible game”. However, we all know this isn’t true, because when they are winning they will say the exact opposite. 🙂

angry king

Another major sign which displays if a player is tilting is if they constantly keep making silly mistakes. For example, they put low HP cards directly in front of tank killers, and high damaging cards. 


Another specific case is if you are playing a special challenge or a challenge, you will tend to lose many gems in either restarting the challenge or continuing on with the challenge. This will eventually lead you to spend real money in the game to buy more gems since all you care about at that time is to beat that challenge.


Luckily, tilts can be easily avoided with the tricks I will give to you below. So, make sure to keep reading on! 


Tips on Avoiding having Frequent Tilts

The good news is that there are various amounts of tricks that can be used to avoid tilts! 

Some of these tips and tricks are easy to follow as to adding 1+1! (As stated earlier)


If you are doing ladder, just stop playing ladder for some time.

Relax. Take a deep breath. And exhale. 

Now. that you are calmed down, you can start to play other game modes, NOT the game mode you were previously playing. For example, if you were playing ladder before the tilt, I will highly recommend you playing 2 vs 2, or another party mode because in this way, you won’t lose trophies, even if you lose. This way you are practicing your moves for when you are going to play those ladder matches. 


Another trick that can come in handy is when your opponent BM’s you by doing emotes, especially when they do the “king crying” emoji, which just rubs into your face, you can either just mute emotes or another way to get your opponent to shut up is you could do another counter emoji, for example in this case “the king laughing emoji” to make it seem that you don’t care and your opponent will get the hint and they will stop. Choose whichever suits you.

mute

For avoiding “fat fingering”, it is best advisable that you should have your full concentration on the match and both your hands should be holding the device and make sure your finger is firm so you don’t accidentally misplace your unit.


If you are playing a challenge or a special challenge, the only best trick I can give you is that you should take a break from the challenge or even the game itself for some good time while you calm down and relax. 


As you might have deduced, the majority of these tricks have one thing in common and that is that you should take breaks while playing the game and especially if you are losing many games. A bonus is that you don’t kill your eyes, too! 🙂 Take a break and analyze your mistakes by rewatching your past matches and also you can look at other players and learn from them. As known, a person can get better by learning!


Thank you guys for reading this guide. If you appreciated it, leave it down in the comments and tell me also if you feel anything can be edited, I will sure try my best to do that!


May 4th Balance Update

0

What’s up! It’s yo boy, Nitrome95 here bringing you with the most up to date Clash Royale news!  Today, we will be discussing the May 4th Balance Updates and what it could mean for the change in meta!  Without further ado, let’s get straight to it!

While this won’t have the same thoroughness of an OJ video with all the interactions, I intend for this to have more of an overall look at how the balance changes will shake up the meta.

Healer

Reduced hp by 10%

This lass has been dominating the meta in big beatdown decks where the healer’s splash could heal tons of troops while also maintaining its own health.  If left unchecked, a single Healer can get so much value to snowball a push into a 3 crown!

While the Healer still cannot be one-shot by any spells, a large reduction in hp will make her more manageable while you are defending against her.

If you are defending with a Healer, you will need to spend more elixir to prevent her from dying so that she can counterpush.

If you are attacking with a Healer, she will be weaker towards mid dps troops (Musketeer, Valk, Knight, etc.)  This will nerf big beatdown pushes as a whole.

Royal Delivery

Increased damage by 27%

Before you think this is an op buff, realize that spells usually have more drastic buffs and nerfs because they deal much less damage than traditional troops.

In my opinion, this card will still be super niche.  It will likely kill a bunch of low/mid hp troops (Wizard, Musketeer, Knight), one shot faster, but there’s no reason why you can’t just use valkyrie.  It has much better splash, damage, and hp for counterattacking, so you get a lot more value from one more elixir.

I guess it can be useful in a few scenarios though.  Compared to Valkyrie, it is more effective in dealing with Goblin Barrel.  Also, the push back in some scenarios can be helpful on defense.  Still very trash on offense though.  The benefit that also might help is that the Royal Guard takes no damage before it’s “first swing” (the drop damage), while the Valkyrie does.

Like I said, still niche.

Baby Dragon

Decreased health by 8%

Very similar to Healer, this card was just SO HARD to deal with on defense if you didn’t have a super strong air counter.  This will make it easier to defend against and once again nerf big beatdown decks.

Magic Archer

Range increased by 1 tile (6>7), Health decreased by 10%

I REALLY like this change.  Now, Magic Archer will have more range than Dart Goblin while decreasing its health to account for the fact that it’s harder to hit.

This lines up more with the philosophy that it’s a support card like Princess instead of a regular range card like a Musketeer or Wizard.  I never thought this card was too good or too bad but I really appreciate the design change.

MIni Pekka

Melee Range reduced from Medium to Short

This is a really big deal.  While Mini Pekka will still be great value on defense, it is heavily nerfed on offense.  Because it’s range is decreased, you should be able to wedge certain cards between your tower and the Mini Pekka to prevent damage after it locks on to your tower.

In general, it also gives your troops about one more hit on the Mini Pekka before it locks on your tower: the difference between no damage and a truckload of damage.

Goblin Cage

Goblin Brawler damage increased by 6%

Not much to say here.  This card sucks, hopefully it’ll be more threatening.

Huts/Spawners

Health Nerfs: Furnace 16%  Barbarian Hut 20%, Goblin Hut 35%

These nerfs will allow you to play a lot more offensively against spawners for 2 reasons

  1. You can penetrate their defenses sooner to get some nice shots on the tower.
  2. Attacking a building will deny more hordes, giving more elixir value to your defense.

Goblin Hut was the strongest of the three, hence the biggest nerfs.

Earthquake

Damage Increased by 11%, Building Damage Decreased by 25%

Not sure how I feel about this buff.  On one hand, I think it’s great for the utility of the card.  It was very niche because for 3 Elixir it could counter lots of buildings while not being too useful outside of it.

On the other hand, I think it’s too much.  Now, Earthquake can slow troops, do good building damage, and now can do considerable damage to troops!  I feel this is the same problem as tornado and that this change will make Earthquake OP.

Tornado

Duration Decreased from 2 to 1 second, Pull Strength Doubled, Damage Per Second Doubled.  Now does tower damage.

We’re saving the best for last!  For the past year, Tornado has been a staple in so many decks – it does everything it needs to.  Attack?  Just pull the defending troops to the tower and you’ll obliterate them.  Defend against a beatdown push?  Pull the troops together and splash them for max damage!  Any squishy troops?  Too bad!  A Hog push?  Just pull it to the king tower.

Basically, this card does everything.  By decreasing the duration by 1 second, but increasing the pull strength and damage, they are keeping the pulling and damage constant, just nerfing the splash nado combo.

Now, Tornado will serve ONLY to bring the troops together and won’t keep them there in a ball of death.  

A nice added bonus was to give it tower damage to prevent the card becoming too niche.

Conclusion

Who lost the most from these nerfs?  The biggest nerf was to Golem.  The Tornado, Baby Dragon, and Healer nerfs were all big hits at Golem and big beatdown.  The huts will also nerf certain beatdown decks by weakening their defense.  Also, the nerfs will affect lots of splash nado Graveyard decks.  I still think these decks will be threats in the meta.

In turn, everything else gets a nice small buff in relation to these decks.  Lots of cycle decks struggle with Graveyard so these buffs could help.

Anyways, this is just my opinion.  Comment below if you agree or disagree and I’ll see you next time!

SUPERCHARGING your play: #1 Card Rotation

0

Hey! Nitrome95 back with another Clash Royale guide.  If you know who I am, congrats, you’re old!

While looking at my past articles, I found my Ultimate Guide to Improving your Skills in Clash Royale guide where I mentioned some advanced techniques that I didn’t elaborate much on.  These are the most important skills that, in my opinion, separate the good, great, and pro players.

Today, we will be looking at Card Rotation, what it is, how to use it to your advantage, and how to practice it in real matches!  If you guys like this series, I have lots of other ideas, including win conditions, resource management, and matchups that I could share my expertise on.  Nevertheless, let’s get to the guide!

What is Card Rotation?

When both you and your opponent start a match, each of you receives four cards in your starting hand.  In addition, the four cards that are not in your starting hand will come into your hand at a random order, replacing the last card you played.  The first four cards in your rotation are determined by what cards are not in your starting hand.  After you play four cards, the 5th card in your rotation will be the 1st card you played, the 6th will be your 2nd, etc.

emptydeck


In other words, when you play a card, you need to place four more cards to get back to it.  That means you can know exactly when you will receive which cards, and more importantly, when your opponent gets their cards.  Theoretically, you can memorize their entire hand at all times and know what they want to do at all times.  In practice, there is too much to do in a match to be able to exactly do this.  Therefore, we will try to get as much value from keeping track of rotation using this technique.


Counter Web

Keep a mental track of which of your cards counter your opponent’s cards.  When starting, it is best to focus on your opponent’s cards that you only have 1 or 2 counters to.  For example, if your only air targeting troops are Ice Spirit and Musketeer, you should save them for your opponent’s Balloon.


Visually, this can be seen as a web, where cards are connected to each other based on their counters.  If you can visualize this, you can attack and defend smarter.  For example, if you know that your only counter to Wizard and Valkyrie is Knight (because all your other troops are log bait), you should not waste your Knight on defending a Furnace.  Instead, you can use your Ice Spirit, which is much less effective against those troops.


Or, if they have a Valkyrie in their hand, you shouldn’t waste your elixir on a Goblin Gang at the bridge.

goblin gang star level

Fast Decks

If you are playing a “fast deck”, or a deck that has a very low elixir cost, your goal is to put your opponent in a bad cycle.  This means that they never have the counters necessary to counter your offensive pushes.  This is because you can place so many more cards than your opponent, allowing you to control where and when you get certain cards.


You can place your opponent in extremely awkward positions if they are not careful.

For instance, a classic move for Xbow cycle players is to place it defensively.  When I first saw this movie, I was like, “good job idiot now you wasted 6 elixir and can’t attack”.  Now, I realize how smart of a move it is.  

xbow defensive

Because it costs 6 elixir, it forces your opponent to place something or else they leak elixir before you do.  Swarms are ineffective because of Xbow’s high dps and fire speed.  Mini tanks are not great because they are often slow and easily countered on the xbow’s side.  Thus, it is 


The best option to defend (it seems), is to place down a tank.  But what if I told you that’s what the Xbow player wants?  The biggest counter to Xbow is a reactive tank.  By having the Xbow player place their Xbow, it forces a reactive tank without an elixir commitment of pushing and the added defensive value of the Xbow.  Then, they can cycle to their next xbow super fast and blow the tank player out of the water.


The Xbow player puts the beatdown player in an awkward situation because it forces the beatdown player to make the first move.  They won’t have their tank counter to your Xbow when they need it most.  If the beatdown player then tries to defend, they will likely put themselves at an elixir deficit from spamming troops.  At that point, it’s a free win.


Slow Decks

What can you do as a beatdown player to counter such a strategy?  If you notice, beatdown decks have lots of “multi-utility cards”, meaning that they are expensive cards that have lots of uses.  A baby dragon can serve as splash defense, ground only killer, offense, and decent air killing capabilities.  Because of this, it is harder for them to stay out of cycle.  They always have an all-purpose counter in hand.


You should exploit this aspect of slow decks.  Instead of trying to keep up with the volume of cards played by a fast deck, you should focus on playing as little cards as possible to conserve your elixir.  Because slow decks often spam lots of cheap, fragile troops, a single hefty troop can easily gain lots of elixir value without taking much damage.


Basically, patience is key!


Mirror Matchups

This is where cycle matters the most.  Why?  You and your opponent have the same offensive and defensive capabilities.  If you can play cards when your opponent doesn’t have counters, it’ll feel like it’s a hard matchup!

magic archer


(Hey will can you put an image of the deck – Princess, goblin gang, rocket, log, goblin barrel, knight, inferno, and ice spirit).

Consider a mirror bait matchup.  Player one plays Goblin Barrel, player two plays Log.  Player two plays Goblin Barrel, player one plays Log.  Player one plays a Princess in back.  Player two plays Knight to counter.  Player one plays Goblin Gang to counter.  Player two plays Princess to counter.  Player one plays Knight to counter.


If you can visualize the interaction, you will see that neither player took damage, both played the same exact cards, and a whole lot of nothingness happened.  You have to break the cycle.


Consider an alternate scenario with the same decks.  Player one plays Goblin Barrel.  Player two Logs.  Player two plays Goblin Barrel but player one Goblin Gang counters and takes two stabs.  Then, player two split lane Goblin Barrels.  Now, player two must deal with two Log bait threats with no Log!  


TLDR, if you see a whole lot of nothingness happening on the board, change it up as long as you don’t put yourself in danger.


Conclusion

Hopefully, lots of examples made it clear how one should approach card rotation.  A lot of pros will suggest to just “memorize the hand”, but honestly there are much more interesting and practical applications.  I hope that a lot of what I said is obvious, but makes more sense when it is put into words rather than some abstract idea.  That way, if you’re playing badly, you can remember this guide to untilt yourself.


Once again, let me know if you want more guides to take your play to the next level!

Top 8 Clash Royale Strategy Tips for Winning!

0
clash royale strategy

For those wanting to push their gameplay to the next level, here are some great Clash Royale strategy tips to do so.

Making use of these strategies is essential to enhancing your skills and improving your fundamentals.

clash royale strategy

Top 3 Clash Royale Strategies for All Players!

Strategic Tip #1: Patience Is Key!

Move not unless you see an advantage; use not your troops unless there is something to be gained; fight not unless the position is critical.Sun Tzu, The Art of War

This strategy definitely depends on your deck, but if you are playing a heavier one, like Golem, it is very helpful to wait for your opponent to make the first move.

Patience Is Key
Patience Is Key!

This gives you a couple of advantages:

  1.  Decreases the time until double Elixir, where heavier decks are the most powerful.
  2. It allows you to respond to any plays that your opponent makes.
  3. Prevents you from being quickly countered. A great example of this is playing a Golem in the back. If your opponent is smart, they will quickly push the opposite lane, and you will have little elixir to defend.

On the contrary, if you are playing a cheaper deck that thrives in single elixir, you want to start the game relatively early. A perfect example of this is bait. The best CR strategy for these decks is to wait a couple of seconds, then make a safe play. This allows for you to see if your opponent plays right at 10 elixir, then react, or start the match early.

Strategic Tip #2: Learn How To Count Elixir

Counting cards is incredibly useful because it tells you when the best time for you to push is. Although counting cards seems very hard at the beginning, it can be reduced down to some pretty simple concepts.

When counting cards, it is crucial to count whether or not you have the advantage, not every single card.

Here are some examples:

Your opponent plays a Clash Royale Musketeer Musketeer and you Clash Royale fireball Fireball it immediately. This is a neutral trade.

You play a Clash Royale Hog Rider Hog Rider and your opponent defends with a Clash Royale Cannon Cannon. You are now at -1 elixir.

These calculations become much more complex when you factor in units that are leftover from earlier pushes.

A good way to make it a little easier is to wait until both players are recouping their elixir. When this is happening, you can assume that both are back at equal, and if they play a card before 10, you know that you are behind.

Card counting can take a while to pick up but can be incredibly useful once you get the hang of it.

stop pushing

Strategic Tip #3: Know When to Stop Pushing

It can be very tempting to contribute to your push with an additional support if you have an elixir lead.

However, making these plays are typically what ends the advantage you have.

It is crucial to not put similar troops together, as this makes your opponent’s job incredibly easy.

Adjusting your deck can also be an easy way to combat this issue. A great example of this is decks with multiple wizards or dragons. All of these cards can be countered easily by themselves, and even easier when together.

I hope you enjoyed this guide and find these Clash Royale strategies helpful. Let us know what you think about these tips in the comments below.

5 Advanced Clash Royale Strategy Tips

Guild by Bailey OP

It can be easy to start playing Clash Royale on a per interaction basis. While this strategy can be effective in lower arenas, it quickly becomes crucial to think about the big picture.

1. What is the opponent’s deck?

If you know your opponent’s decks, you would win every single battle in Clash Royale with ease.

Knowing the cards your opponent is should be the thing you want to do at the start of every battle. And we will discuss all about it in this article.

If you don’t know the most popular Clash Royale decks of the current meta gane, you will have a lot of troubles.

You always want to know what is your opponent’s deck and how to counter the cards.

There are 2 ways to figure out the deck list.

You can just wait for them to play all of the 8 cards out and remember all of those cards in your mind while playing. This strategy is very difficult, especially for people who have bad memory like me haha.

The other strategy is to just remember the key cards. For example, if your opponent is running Mini P.E.K.K.A, you don’t need to remember their other counters to your Hog Rider.

The easiest way to know is when your opponents are using meta decks. And you have remembered every single meta deck of Clash Royale, right?

question mark legendary cards

2. Bait Strategy

Understanding whether the opponent is playing a bait deck early helps you predict the win-conditions of the opponents and assign specific counters to them.

You might think I am talking about bait strategy like log bait here. But it isn’t.

You probably notice that even decks like Golem decks often have a bait card. You want to find out the bait cards they have and always keep the counters in your hand.

It’s extremely important to figure out the bait strategies your opponents have right at the beginning of the battle.

If you use your best counter card and then they hit you hard with the bait card, you will be crying just because you were too eager to play your “hard-counter”.

You want to plan out the most efficient ways to deal with those bait cards. And this would be easy if they are using a meta deck like the one below:

Clash Royale PrincessClash Royale The LogClash Royale Ice SpiritClash Royale Goblin Barrel
Clash Royale Goblin GangClash Royale RocketClash Royale KnightClash Royale Inferno Tower

3. Can they counter my win-condition?

No need to say, your opponents always have some sort of counters to your win-conditions.

They can be hard-counters like Rocket vs Sparky or something more flexible like Goblin Gang vs Hog Rider.

Knowing the cards your opponents will use to counter your win-condition allows you to respond fast and deal more damage. Or even sometime, you can predict it and make a “wow” move.

Try to ask yourself what is the opponent’s counter to your cards at the start of the game helps you play easier for the entire match. The sooner you can figure it out, the more damage you can deal.

There are two strategies for this: You can strengthen your push or you can make a predictive move.

Adding cards to support your win-condition and disrupt the opponent’s defensive strategy. For example, we usually support the Hog Rider with Ice Golem in case the opponent uses Minions, this makes them Zap-able so you will be able to counter the counter. The best time to do this is when your push is about to cross the river.

Meanwhile, the best time to make a prediction is when your cards have already crossed the river.

Use the same example as above, but this time you can use Fireball to counter the Minions while dealing some extra damage to the Tower.

4. What’s the best Clash Royale strategy to counter the opponent’s win condition?

Now, let’s talk about defense.

You want to counter the opponent’s win-condition and this is pretty similar to the strategies we mentioned above.

You want to know their win-conditions right from the beginning of the game so that you can counter it the entire battle with the best cards you have. And you want to keep that counter card in your hand all the time to counter their win condition immediately for the minimal damage taken. Unless they use Rocket.

Again, if the opponents use meta decks, it will help you a lot!

If you see a Musketeer & Skeletons at the back, you know that you want to save your Tornado…

Once you have known their win-conditions, keep in mind that they are also trying to counter your counters.

You want to switch up your counters so that your opponents cannot make a predictive move or to counter their bolstering pushes easier. If you don’t have better choice, you can try to change the placements of your cards on defending.

These two strategies make the tricks your opponents wanting to use less effective, giving you more time to react properly.

When countering predictive cards, delay your placements a bit. This trick works very well. Your opponents will sometimes miss the spells and get raged :D.

5. Punish or Invest?

When you have a huge elixir advantage, you might ask yourself this.

Basically, if your win-condition is more expensive than the opponent’s, place it at the back and then start building up a huge push rather than placing it right at the bridge.

If your win-condition is less expensive, you can wait for them to play their card then make a move right at the bridge of the opposite lane.

Hopefully, you have found this Clash Royale strategy guide helpful! Feel free to comment down below If you have any question. Cheers!

Firecracker Guide: Best Strategies, Tips and Decks

0
Clash Royale Firecracker

Complete Guide to using the Clash Royale Firecracker: Basic information, best tips for defending and attacking, how to counter her and best decks for her!

firecracker

Firecracker Guide

The Firecracker is a 3 Elixir Elixir Common card which can be unlocked from Hog Mountain (Arena 10).

She is a long-range troop, having a range of 6 tiles, but her shrapnel from her bazooka can actually reach much longer than that! In fact, she can even damage the Princess towers when at the bridge, not unlike a Magic Archer.

Her HP is quite low, meaning that in most cases Arrows will be able to kill her.

Her splash damage is deadly and can provide huge positive elixir trades.

Her knockback is her special effect, which sometimes makes her unpredictable and tricky to kill with Spells.

However, all this comes with a weakness: how easily she activates the King Tower!

In fact, in 2v2, she hits the King Tower even when there are no other troops around.

Firecracker’s Stats

Level Hitpoints Area Damage Damage per second
1 119 25 x5 8 x5
2 130 27 x5 9 x5
3 143 30 x5 10 x5
4 158 33 x5 11 x5
5 173 36 x5 12 x5
6 190 40 x5 13 x5
7 209 44 x5 14 x5
8 229 48 x5 16 x5
9 252 53 x5 17 x5
10 279 58 x5 19 x5
11 304 64 x5 21 x5
12 334 70 x5 23 x5
13 367 77 x5 25 x5


Clash Royale Firecracker

Useful Firecracker Interactions To Know

▶️ A firecracker can fully counter a P.E.K.K.A. and Mega Knight (Placement: 5 tiles from king tower, 4 tiles from river path).

Place the firecracker right as the troop crosses the bridge.

Keep in mind, this is difficult to time and hence a risky play if you’re out of elixir as a result of a display!

▶️ She can one-shot any unit with the same or less health than Archers (hence, a Firecracker can one-shot an opposing Firecracker/Archers of the same level).

▶️ When facing the Firecracker, you can activate your king tower easily. Placing most troops a few tiles in front of the king tower when the firecracker has walked 2 steps past the bridge will activate the king. However, this requires precise time and some practice!

▶️ A Log one level higher than a Firecracker will kill her.

Best Cards to Use with Firecracker

Clash Royale Ice GolemClash Royale Hog RiderClash Royale TornadoClash Royale Mini P.E.K.K.AClash Royale KnightClash Royale Valkyrie

Best Counters to Firecracker

Clash Royale SkeletonClash Royale Ice SpiritClash Royale ArrowsClash Royale Poison

Firecracker’s Defensive Utility

The Firecracker is, first and foremost, a defensive card.

Keep in mind the fact that your opponent will probably know how to activate the King Tower with her if you are playing above 5300+, most likely, but of course, there will be skilled players below that trophy range!

Therefore, if you are well above that trophy range, be prepared to be at a slight disadvantage because of your opponent’s king being activated.

This is precisely why the Firecracker should never be sent alone.

You may think that you can just cycle the Firecracker in the back like Archers, Bomber, or any slow-ish cheap troop. But this is just a free king activation and a waste of 3 Elixir elixir, no matter what your opponent’s deck is!

She should always be played as a reactive card, for example, to counter split Barbarians or any other swarm.

She can gain huge positive elixir trades through staying alive for a long time, because of her very long sight range, shrapnel range, and of course her unique recoil ability.

Her recoil ability also means that it can be difficult for your opponents to target her with a Miner because you can just place something in front easily to block, and the recoil will make it even more difficult.

Keeping the Firecracker alive in any cycle/control deck, decks in which she will most frequently appear in top ladder and containing cards she synergises well with is very important.

Treat her like a Musketeer in 2.6 Hog, or a Princess in Log Bait. Cycling her over and over again would make sense, as she can be an extremely finicky card to deal with if your opponent does not have a hard counter like Arrows or Fireball.

Even so, it is sometimes difficult to predict where the Firecracker will recoil back to, leading to her often evading spells.

She synergises well with Tornado, like many other splash troops, apart from Hunter, because of the huge damage dropoff as distance increases. She can stay in safety near the King Tower while you clump all your troops up.

She can work like a Magic Archer, damaging troops behind the main tank. But unlike a Magic Archer, placement does not matter as much because she doesn’t fire a straight arrow, so you don’t need perfect geometry.

As a result, she synergizes excellently with a tank buster like the Mini Pekka, an incredibly tanky and hard-hitting card for its cost. Because of how easily she is countered, protect the virginity, as SirTag would say! You can’t let that Knight’s sword near her.

Like the Princess, she has an incredibly slow hit speed but her splash damage and range undoubtedly make up for this shortcoming.

When you are using her, make sure not to place her too far away from the attacking troops because she could switch lane easily and end up ignoring the troop. Usually, her very long sight range compensates for this, but just keep this in mind because she can sometimes lose sight of other enemies

As mentioned earlier, she can activate the king tower with a number of different plants.

She can even lure a Mega Knight to the King, with the Firecracker still surviving! However, usually, you wouldn’t be doing this in regular play unless there’s a naked Mega Knight on the field and your opponent is down elixir. It’s incredibly satisfying if you do manage to pull it off and your opponent will be spamming angry emotes as a result!

A cool fact if you didn’t know: The Firecracker can completely dodge the Bowler’s bowling ball.

Firecracker’s Offensive Utility

Although less of an offensive card due to her slow hit speed, she is still a big threat.

Sending a Hog and a Firecracker is a good combo, with the Firecracker’s huge AoE obliterating Skeletons and Minions alike.

She does not work in the same way as a princess – Don’t just plop her at the bridge because she will get a minuscule amount of damage – 385 damage from 1 hit at max level, whereas the Princess will always force elixir from the opponent which you can counter if you’re quick.

Even if there is an Elixir Pump behind the Princess tower which she can splash onto, do not deny one less elixir from your opponent with that one firecracker hit onto the Pump, having just wasted 3 Elixir elixir yourself for very little damage!

Also, keep in mind the obvious- that Firecracker can be tricked into hitting the King tower against a smart opponent.

That having been said, the Firecracker, if protected by the likes of an Ice Golem or a Knight, she can chip the tower from the opposite side of the arena, also opening up for yourself a huge area of denial where the opponent cannot play their swarm cards, especially if there are 2 firecrackers on the field which you will ideally want to get down in a cycle deck.

She is good for opposite lane pushes as well, because she can push herself back into the other lane. Although I said earlier that she does not force as much of a response as the Princess, the opponent still will have to spend quite a lot of elixir countering her if they don’t have the proper spells to counter her.

One of the most important things to note when using the Firecracker, if you didn’t already know- NEVER, EVER use her in 2v2 because she will AUTOMATICALLY activate the king.

Not great.

Best Decks with Firecracker

Deck 1: All-New Hog 2.6 w/ Firecracker

Clash Royale Hog RiderClash Royale Ice GolemClash Royale Mini P.E.K.K.Afirecracker
Heal SpiritClash Royale BatsClash Royale earthquakeClash Royale The Log

Long live the new 2.6! This deck is undoubtedly the most popular Firecracker deck, used extensively on the ladder by top players like Morten and RUBEN. This being said, it is a very high-skill deck to use due to the fragility of most of the cards. Unlike the original 2.6 (still popular!) there is no defensive building. Instead, Mini Pekka takes the role of tank buster, perhaps unsurprisingly so, due to the rampance of Mini Pekka in many meta decks! Firecracker can provide huge value and works similar to the Musketeer in the original 2.6 deck.

Below is gameplay of this deck from Inigo, a Mexican player who has finished as high as 67th in the world with this deck.

Deck 2: RG Firecracker Cycle

Clash Royale Royal GiantClash Royale Ice WizardfirecrackerClash Royale Skeleton
Clash Royale Bomb TowerClash Royale earthquakeClash Royale TornadoClash Royale The Log

This is a very solid deck, hard countering many of the decks in the meta with meta cards of its own, such as Miner WB (Bomb Tower, Log, Skeletons), XBow 2.9 (RG, Earthquake), Hog 2.6 of either type (Bomb Tower, Tornado), Splashyard (Bomb Tower, Log), and EGolem (Bomb Tower, Tornado). Overall, this is a super strong deck, with a focus on defence and then a counterpush with none other than the mighty Royal Giant!

Here’s this deck being played, but with Barb Barrel instead of Log (shouldn’t make too much of a difference.) It isn’t so popular now, but it is definitely still viable.

Deck #3: MK WB Firecracker

Clash Royale Mega KnightClash Royale wall breakersfirecrackerClash Royale Electro Wizard
Clash Royale Mini P.E.K.K.AClash Royale MinerClash Royale Goblin GangClash Royale Zap

This is an extremely good challenge deck, which is a variation on the MK Wall Breakers Spam deck popularised a few months ago. The Firecracker combined with the Mini Pekka, a staple tank killer, plus dual win conditions Miner and Wall Breakers, such a powerful combo and often leaving your opponent at an elixir disadvantage. Mega Knight, of course, is there to clean huge clumps of troops up!

Here’s SirTag using this deck!

Bonus Deck: 1.8 Bandit Firecracker Cycle

Clash Royale mirrorHeal SpiritClash Royale Ice SpiritClash Royale Bats
Clash Royale SkeletonfirecrackerClash Royale BanditClash Royale Zap

The man, the myth, the legend, Bufarete has used this deck on top ladder before, managing to reach 8000 trophies with ease.

Just kidding! DO NOT try this on ladder unless you want to troll!

I hope you guys enjoyed this guide to Firecracker, and make sure to read more about the card.

This is by no means an exhaustive guide!

Firecracker is a great card with a highly interesting and unique mechanic, plus the benefit is that she is a Common card, making her easy to upgrade. Try her out!

A Guide to Battle Healer

0
Clash Royale battle healer

A detailed guide to the Clash Royale Battle Healer!

Clash Royale battle healer

Battle Healer – Basics

battle healer

The Battle Healer is a 4 Elixir elixir Rare card which can be unlocked from Spooky Town (Arena 12.)

She deals moderate damage, having a relatively high HP, so she can be used as a tank.

However, her unique power is her ability to heal surrounding troops when she is attacking, while healing herself too.

She can kill lots of troops easily due to her high HP and her healing effect.

giphy

Stats

Level HP Damage DPS Passive healing per pulse Passive healing per second Active healing per pulse Active healing per second
3 900 70 46 11 44 12 32
4 990 77 51 12 48 13 35
5 1,089 84 56 13 52 14 37
6 1,197 93 62 14 56 16 43
7 1,314 102 68 16 64 17 45
8 1,440 112 74 17 68 19 51
9 1,584 123 82 19 76 21 56
10 1,737 135 90 21 84 23 61
11 1,908 148 98 23 92 25 67
12 2,097 163 108 25 100 27 72
13 2,304 179 119 28 112 30 80


Strategies for Battle Healer

Best Cards to use with Battle Healer?

Clash Royale Night Witchelixir golemClash Royale PoisonClash Royale Electro DragonClash Royale Baby DragonClash Royale Golem

Best Counters to Battle Healer?

Clash Royale KnightClash Royale Mini P.E.K.K.AClash Royale ValkyrieClash Royale Ice Golem

(basically, any relatively tanky melee troop works well)

Offensive Utility

She is very good in big beatdown decks because of the huge value that she can provide with her healing aura.

For example, in an Elixir Golem deck, she is very strong because the three forms of the Elixir Golem (big boi, medium bois, and small bois) can tank for the support troops for a very long time, allowing things like Night Witch and Electro Dragon to be placed behind, along with whatever else.

Combined with the Battle Healer, if the Battle Healer attacks your enemy’s defensive troops (which they will inevitably have to put down) all your troops in that area will be healed, almost providing infinite HP for the troops as long as the Battle Healer is alive!

This makes a big Elixir Golem push extremely hard to stop.

Similarly, she can also be used very effectively in Golem decks, but she cannot be cycled and spammed as quickly because of the Golem’s elixir cost.

Other than this, she cannot be used in very many other decks. Because of her medium move speed, she is not very good in decks like Hog, Balloon, or Miner Cycle/Control because she does not provide much utility in healing her troops, which is her main point, because she does not exactly provide much DPS. However, she does work in one Ram Rider Spam deck because of the number of medium health troops. She is the main star in that deck!

giphy

Defensive Utility

On defence, she is also very useful because of her tankiness.

Combined with a high-HP troop like Mini Pekka, she is very useful in keeping the defensive troop alive.

Always make sure never to send her alone because she can be countered fairly easily.

It is when she is with troops around her that she is at her most deadly because she is also often shielded by these other troops!

Countering a push with Battle Healer

OK, so you’ve just seen your opponent place an Elixir Golem in the back. Oh no. Now a Night Witch comes down. Double oh no. Now the Battle Healer comes down. Triple oh no.

What do you even do?

One of the reasons Bomb Tower has been very good in the past few metas has been because of how many Elixir Golem Battle Healer decks there have been running around, and Bomb Tower was the biggest hard counter because it is one of the only two building that do splash damage.

Therefore, Bomb Tower plus Tornado will work wonders, shutting down everything easily.

Basically, you will want to shred the tank down as quickly as possible, then destroying everything behind, along with the Battle Healer, with a high damage troop or a spell such as Fireball or Rocket.

She is extremely annoying to deal with if you can’t kill her initially, so stay patient and don’t rage. You will feel like you are helpless, but just keep trying again next time if you don’t succeed!

Best Decks for Battle Healer

Deck #1: EGolem Healer w/ Magic Archer

elixir golembattle healerClash Royale Night WitchClash Royale Electro Dragon
Clash Royale Magical ArcherClash Royale Barbarian BarrelClash Royale TornadoClash Royale Poison

EGolem, Healer, Night Witch, Electro Dragon, Magic Archer, Barbarian Barrel, Tornado, Poison

This one will not be so strong after the new Magic Archer nerf but is still very good.

This is an incredibly toxic deck that your opponents will hate you for playing. But you don’t care, right? Winning is what matters…hahaha.

Basically, just defend with the minimal amount of Elixir in single elixir and don’t be afraid to lose your tower, just make sure you have gotten a substantial elixir advantage in order for you to build up a big push in Double Elixir and overwhelm them.

Basically, keep spamming troops behind, almost mindlessly. The number of splash troops combined with Tornado allow you to counter a large range of decks, and Lightning is very useful on offence.

Try this one out! Also very, very good in Triple Elixir/Infinite Elixir.

Here’s SirTag playing this deck.

Deck #2: EGolem Healer w/ Barb Hut

elixir golembattle healerClash Royale Baby DragonClash Royale Electro Dragon
Clash Royale Barbarian HutClash Royale Barbarian BarrelClash Royale TornadoClash Royale Poison

The new meta EGolem deck! The big spell bait potential of the Barb Hut means you are free to spam as many troops as you like behind that big purple Golem, plus the new death spawn makes the Barb Hut even more deadly, building up more and more Barbarians.

Here’s some top ladder gameplay of this deck by one of the best Elixir Golem players.

Deck #3: Ram Rider Bandit Healer Spam

Clash Royale Banditbattle healerClash Royale Electro WizardClash Royale Cannon Cart
Clash Royale Ram RiderClash Royale Magical ArcherClash Royale fireballClash Royale Barbarian Barrel

This strange-looking deck is actually one of the best decks in Grand Challenges! Good thing it’s mainly a challenge deck because it’s not a good deck to use if you’re F2P (4 legendaries, 2 epics, 2 rares!)

However, it is also used in top 200 ladder to great success.

With this deck, keeping up constant pressure is key. Cannon Cart is often underestimated and can deal great damage to your enemy’s tower.

Split lane pushing is often a good idea, especially in double elixir due to the number of fast high-pressure troops which force a response. Battle Healer is a big nuisance to deal with, and this deck really is a handful to deal with!

Here’s seasoned pro Coltonw83 using this deck to great effect.

Deck #4: Golem Healer

Clash Royale Golembattle healerClash Royale Mini P.E.K.K.AClash Royale Dark Prince
Clash Royale Baby DragonClash Royale Electro DragonClash Royale Goblin BarrelClash Royale Tornado

The Elixir Golem’s big brother takes centre stage with this deck.

Essentially a modification of the Elixir Golem decks, this has been used to great effect, especially showcasing the strengths of the Mini Pekka and the Baby Dragon.

Here’s Golem pro FloGeN playing this deck.

I hope you enjoyed this guide to Clash Royale Battle Healer. You might just start using her more, despite her toxicity! She is definitely a very enjoyable card to use.

-Nebula

Clash Royale Season 10 Update (April 2020)

1
Clash Royale Season 10 Update

Hey fellow Clashers! The Season 10 update is near, and this time the Supercell Team is looking at balance changes to 3 new cards, a new arena, and the REMOVAL OF HEAL! Let’s get into it.

Clash Royale Season 10 Update

Clash Royale Season 10 Update (April 2020)

Balances to Cards

Clash Royale Magical Archer

Magic Archer

The big loser here is definitely the Magic Archer. For a while now, over the last few seasons, the Magic Archer has been rampant in many different kinds of decks including Ram Rider Bridge Spam, Hog Cycle, Pekka, Miner Wall Breakers, and more. 

It is incredibly versatile and its uniqueness in being able to hit the tower from the other side of the arena has made it very, very strong and almost too overpowered for just 4 elixirs, with its only weakness being Fireball + Poison

In the nerf, his range has been decreased from 7 to 6 tiles. Despite this only seeming to be a minor blow to the card, it decreases his usability as a ‘win condition’ (if you’d call him that) by reducing his power of GEOMETRY!

This makes him less of a threat on offense, and usage rates could drop a lot, only finding a home in Fireball Bait because of his other stats being untouched, hence the Archer still being useful on defense to bait out spells.

I feel like this could possibly be too much of a nerf, and rework of the card could have been better, such as an increase in damage by a slight amount. A health buff would not be popular, however, because he might not die to Fireball!

Clash Royale Goblin Hut

Goblin Hut

I wonder if Supercell is trying to bring Spawners back? First Barb Hut, now this!

Despite this not seeming like a nerf or a buff, the addition of a death spawn of 3 spear goblins is good value, even if the building’s lifetime has decreased from 50 to 40 seconds.

With a usage rate of 1% on ladder and a near 0% on Grand Challenges (source: RoyaleAPI), the time has finally come for a revival. 

This ‘buff’ is similar to that of the Barb Hut, which succeeded in bringing Barb Hut to certain decks in the meta, namely Splashyard and Elixir Golem decks.

Therefore, Goblin Hut could find its place in the meta, maybe even bringing back Spawner decks (we all love that don’t we). 

Clash Royale Skeleton Balloon

Skeleton Barrel

The Skeleton Barrel was once popular, a staple of Mega Knight Bait especially, along with the likes of Inferno Dragon.

However, with the increased viability of splashers and its very low health, plus the ineffectiveness of the death damage, it has become very unpopular and fallen out of the meta.

It now has given a speed boost (medium to fast) and will probably be used in Miner decks due to its increased pressuring ability.

However, the usage of the card as an investment in the back will not be so effective. The only deck I can really see Skeleton Barrel is with Miner Wall Breakers, potentially, because of the Log/Arrow bait potential.

Its decrease in health by 15% means it will not be able to get as much damage without a tank shielding it.

I don’t see Skeleton Barrel coming back into the meta in any way, unfortunately.

wVvjOJ

First-Ever Card Replacement – The Evolution of Heal!

Clash Royale Heal

Heal Spirit is the first-ever card to replace an old one, Heal. We won’t miss you, Heal. Even Supercell says so, just check the Heal Spirit’s description.

Heal was once popular in 3M decks, but not much else. Its extremely weak healing capacity and just general uselessness meant that there was not really any way that Heal could be used in a viable deck, even being 1 elixir.

With the complete revamp into a troop, plus a huge healing amount boost, now +181% (130 with old Heal to 366 with new Spirit) will make the card very useful, while still staying at one elixir. 

It could possibly replace the Ice Spirit in Bait decks, perhaps if the opponent has Snowball or Zap, the Heal Spirit will be able to heal the Goblins in the Barrel when used together in a push! I can see Log being used much more in the new meta.

It would probably be used more offensive together with other small troops in a bait deck, while also still being useful on defence, but enough troops would have to be in the AoE in order to gain value. But keep in mind that the Spirit is still 1 elixir so it can simply be used for cycling! It could also work very well with Hog Rider to keep the Hog alive for a few more hits, or behind something like an Elixir Golem where lots of troops will have built up behind.

Players should keep in mind that they actually have to hit an opposing troop for the healing effect to work (that is, you need to place it correctly and use it along with other things!)

Overall, the card would be very versatile and usable in many different kinds of decks, especially Cycle.

Buffs/Nerfs I would have liked to see

Buffs

Clash Royale Royal Recruits

Royal Recruits

The Royal Recruits have been basically forgotten and obsolete in the current state of the game, and they have been for a long time.

Because of the prevalence of Bomb Tower and Baby Dragon and other splashy units, their 7 elixir cost is completely unjustifiable, plus their inability to be cast anywhere else other than in a line across the arena is incredibly limiting.

The Recruits themselves have very low health so they are not very useful on defence when lots of support troops are behind.

Perhaps the only saving grace of this card is their usability in certain split lane push decks, such as Royal Hogs or 3M.

Possibly, with the Heal Spirit being essentially a huge buff of Heal, 3M might come back into the meta and Royal Recruits might find their place.

However, they are still very weak overall.

Clash Royale Lumberjack

Lumberjack

Mini Pekka has been insanely strong in the last few metas, with a 26% use rate on Grand Challenges clearly proving this. However, its strengths have hampered the Lumberjack.

Golem Lumberjack used to be very good, as did Bridge Spam and even in Hog decks in some instances. It is all but gone now, because of Mini Pekka’s superior damage and having greater health.

With the focus on strong ground troops/buildings, the Lumberjack’s very fast speed is no longer that advantageous.

I would like to see Lumberjack at the same strength as the Mini Pekka, or at least similar.

It doesn’t make much sense for two cards of the same elixir and which fill the same role in a deck (cheap tank buster) to have such a great difference in usage and strength. What do you guys think?

Nerfs

Clash Royale Mini P.E.K.K.A

Mini P.E.K.K.A

We were all expecting the Mini Pekka to get a nerf. However, no it didn’t! Supercell, you son of a witch.

It can basically fit in any deck, including Golem, Hog, Miner, Royal Hogs, Giant…you name it, Mini Pekka will slot right in that deck. As per my previous section on Lumberjack, Mini Pekka is much too strong, being so easy to use (just plop it down anywhere right on that big troop) and so easy to make positive elixir trades with.

It is extremely strong on both offence and defence which makes it an annoying troop to deal with if there’s a tank in front of it.

Hence, the little Pekka should get a nerf, which could bring Pekka back into contention as well as certain decks which have been pretty dead due to the strength of Mini Pekka (like Giant.)

Clash Royale Bomb Tower

Bomb Tower

Bomb Tower fulfils a similar role in decks to the Mini Pekka, being 4 elixir and very good against tanks and big groups of medium health cards, but just being a building.
Just like the Mini Pekka, it can slot into many decks, like Miner Balloon Cycle, Hog Cycle, and Miner Wall Breakers. It can kill almost any ground troop, with the help of distractions.

Its use rate has been through the roof and its ability to still hold up well against Earthquake due to its high HP.

The prevalence of Bomb Tower has basically killed off all the other buildings apart from if they were already in a long-time meta deck like 2.9 XBow (Tesla) and 2.6 Hog (Cannon).

Inferno Tower has been killed off completely.

It would be nice to see more buildings come to back into the meta with a Bomb Tower nerf.

Clash Royale Baby Dragon

Baby Dragon

As the only air-based splasher, and just 4 elixir, it can provide lots of utility to a deck.

Used frequently in Splashyard and Golem, it is deadly combined with Tornado. 2nd on the Grand Challenge usage rate list shows how popular it is.

It can shut down Lava Hound decks combined with a Tornado and a building, and is very good with Ice Wizard especially for a cheap defence.

It is good vs. Mortar Bait and can absolutely destroy all the ground-based units which seem to be dominating the meta these days, combined with distraction.

I hope you enjoyed my lengthy post, feel free to comment/criticise me below if you think I’m wrong in any way!